Pramit Pratim Ghosh |Updated on: March 20, 2023
In order to register under GST , one needs to ensure that the requisite form, i.e. GST REG-01 is filled with the correct information, and the business owner has the correct documents by his side, in order to complete the GST new registration procedure in time.
In this blog, we have provided a step-by-step guide to obtain a new GST registration:
GST new registration procedure
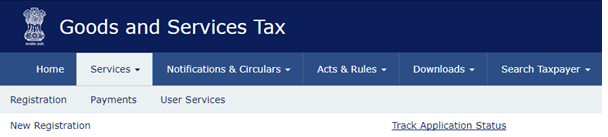
- Log in to gst.gov.in
- Go to the Services tab, and take your cursor to Registration. Once you do that, 2 tabs will become visible New Registration & Track Application Status. Click on New Registration, and a form will open for New Registration, which is Part A of the registration process.
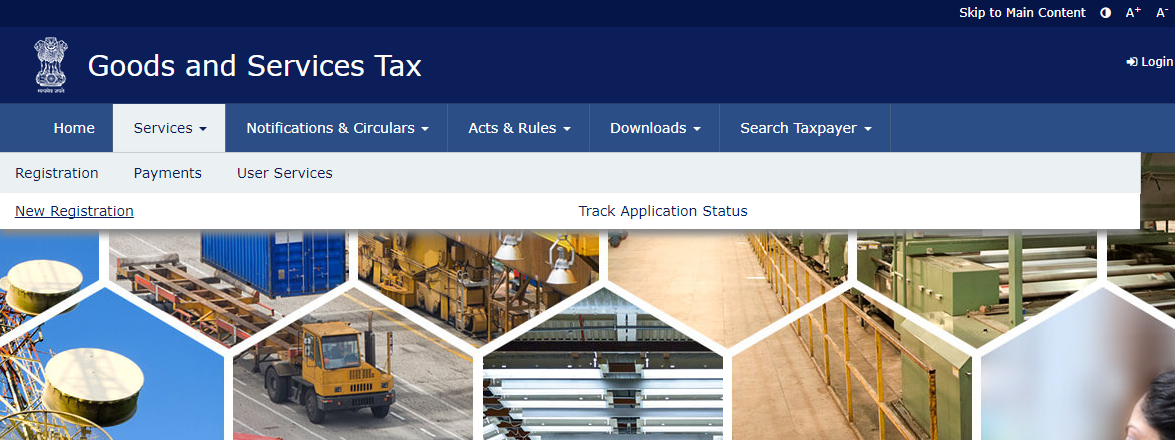
- Right at the top of the form, there will be two buttons – New Registration & Temporary Reference Number (TRN). Ensure that the New Registration button is selected. Once you do that, the first page of Part A will open up, where you need to fill up the following fields and click Proceed:
- I am a* (Options are Taxpayer and GST Practitioner. Select Taxpayer.)
- State / UT*
- District (Options will show once you select the State / UT, for e.g. if you select Karnataka as the State, then District will show options, such as Bengaluru Rural, Bengaluru Urban, Mysuru etc.)
- Legal Name of the Business (As mentioned in PAN)*
(Note: In case of proprietary company registration, here, you have to mention the name as mentioned in PAN. In a subsequent page named Business Details, you will be asked for Trade Name, wherein you can mention your business name.) - Permanent Account Number (PAN)* (If you do not have a PAN, a link has been provided, which will take you to the Online PAN Application page of NSDL)
- Email Address* (OTP will be sent to this email address)
- Mobile Number* (a separate OTP will be sent to this number)
- Captcha Code* (type as provided)
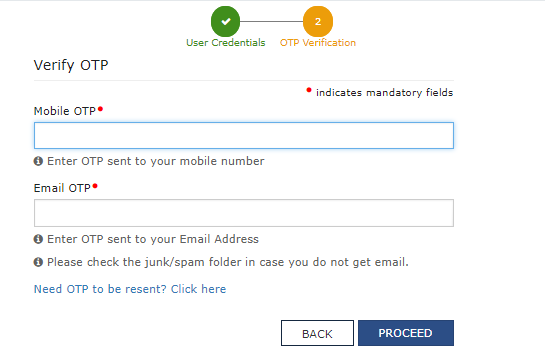
- On the second page of Part A, fill in the two OTPs you received on your email ID & Mobile Number and click Proceed:
- Mobile OTP* (Valid for 10 minutes)
- Email OTP* (Valid for 10 minutes; if you cannot find the mail in your Inbox, please check your Spam folder)
- Once you verify the OTP, a notification screen, containing your 15 digit Temporary Reference Number (TRN) will appear. The same will be communicated to you via email and SMS. Using this TRN, you can access the application from My Saved Applications on the GST Portal. You will need to complete Part B of the application form within 15 days. Click Proceed.

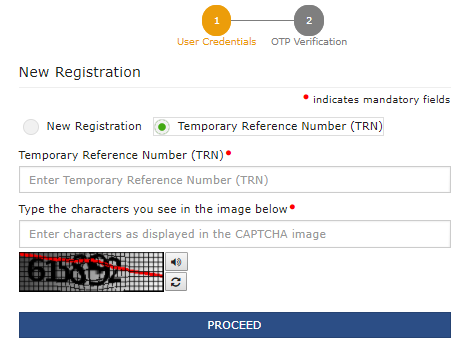
- Once you click Proceed, you are again taken back to the New Registration form. Please note that the Temporary Reference Number (TRN) button is pre-selected. You may fill Part B right away, or come back to the portal and fill it later. On the first page of Part B, fill up the following fields and click Proceed:
- Temporary Reference Number (TRN)*
- Captcha*
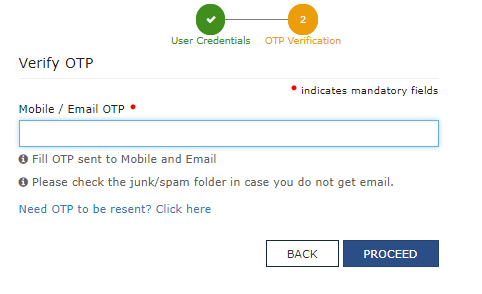
- On the second page of Part B, fill in the OTP you received on your email ID & Mobile Number, and click Proceed:
- Mobile / Email OTP* (Valid for 10 minutes. Every time you login, OTP verification needs to be done)
- Once you verify the OTP, a Dashboard will appear, containing your saved application/s, and the details, especially the Expiry Date, before which you need to complete filling the form. Please note, that the Status field will be mentioned as Draft, and under the Action field, there will be an edit tool available, which you can use to fill the rest of the GST REG-01 form.
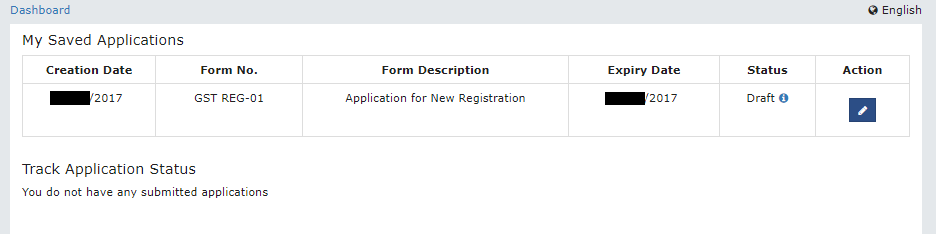
- On clicking the edit tool, the remainder of the form will appear in front of you. On the top, a section in yellow will notify you about the Application Type, Due Date to Complete, Last Modified, and Profile Completion Percentage. Also, the various sections of the form will appear, each of which need to be filled, one by one:
- Business Details
- Promoter / Partners
- Authorized Signatory
- Authorized Representative
- Principal Place of Business
- Additional Places of Business
- Goods and Services
- Bank Accounts
- State Specific Information
- Verification
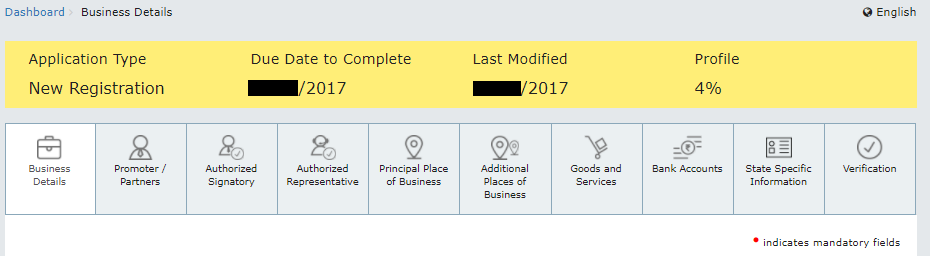
Note: All mandatory fields have been marked with an asterisk (*).
Business details
Details of your business
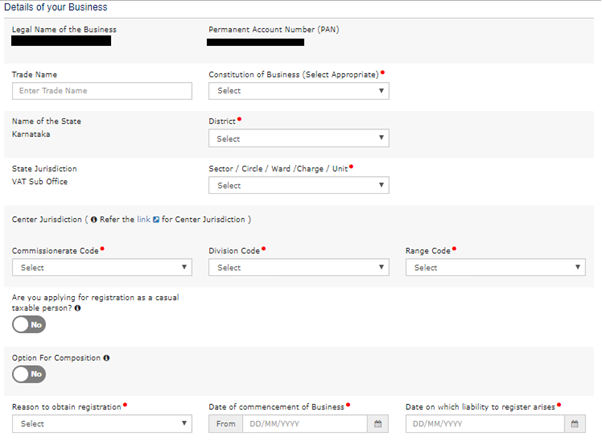
You can see that certain fields now appear autofilled:
- Legal Name of the Business
- PAN
- Name of the State
- State Jurisdiction
The fields you need to fill in, are as follows:
- Trade Name (this is where you can enter the name of your business, as discussed in our previous blog)
- Constitution of Business*
- Foreign Company
- Foreign Limited Liability Partnership
- Government Department
- Hindu Undivided Family
- Limited Liability Partnership
- Local Authority
- Others
- Partnership
- Private Limited Company
- Proprietorship
- Public Limited Company
- Public Sector Undertaking
- Society / Club / Trust / AOP
- Statutory Body
- Unlimited Company
- District* (Based on the State, options will show up from which you may choose)
- Sector / Circle / Ward / Charge / Unit* (The correct VAT office will need to be selected for this field. You may search for your VAT Office Number online, which begins with ‘LVO’. Each VAT Office is associated with a Pin Code and Area, and based on the location of your business, you need to select the right VAT Office.)
- Centre Jurisdiction* (For this section, a link is provided in the same page, using which you can fill up the following fields):
- Commissionerate Code* (Click on the external link, select your State and a new page comprising the Commissionerate Codes will open. Based on the wards and location mentioned under the Jurisdiction column, determine your Commissionerate Code.
- Division Code* (In the same page, observe that the Commissionerate Code is a hyperlink, provided in blue and underlined. Click on the Commissionerate Code relevant for you, and a new page comprising the Division Codes will open. Based on the wards mentioned under the Jurisdiction column, determine your Division Name / Code).
- Range Code* (In the same page, observe that the Division Code is a hyperlink, provided in blue and underlined. Click on the Division Code relevant for you, and a new page comprising the Range Codes will open. Based on the specific ward mentioned under the Jurisdiction column, determine your Range Name / Code).
- Are you applying for registration as a casual taxable person? (Select No, if you are a regular dealer)
- Option for Composition (Select No, if you are a regular dealer)
- Reason to obtain registration* (Choose one of the following options, whichever applicable)
- Crossing the Threshold
- Inter State Supply
- Liability to pay as recipient of Goods and Services
- Transfer / Succession of Business
- Death of the Proprietor
- De-merger
- Change in Constitution of Business
- Merger / Amalgamation
- E-commerce Operator
- Selling through E-commerce Portal
- Voluntary Basis
- Input Service Distributor
- Supplies on behalf of other Taxable Persons
- SEZ Unit
- SEZ Developer
- Others
- Date of Commencement of Business*
- Date on which liability to register arises* (This field will not show if you choose Voluntary Basis under the Reason to obtain registration field)
Indicate Existing Registration

- Type of Registration
- Registration No.
- Date of Registration
At the end of this page, click Save & Continue.
Promoter / Partners
Personal information
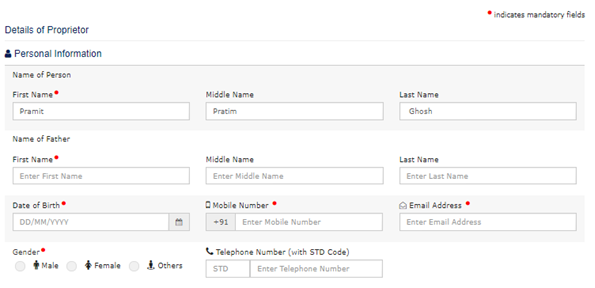
- Name of Person*
- Name of Father*
- Date of Birth*
- Mobile Number*
- Email Address*
- Gender*
- Telephone No. (with STD Code)
Identity information
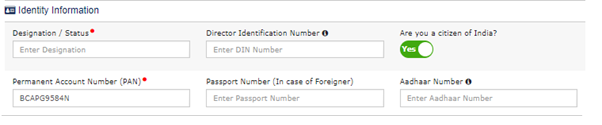
- Designation / Status*
- Director Identification Number
- Are you a Citizen of India? (Yes / No)
- PAN*
- Passport Number (This field is compulsory if you select No for Are you a citizen of India?)
- Aadhaar Number
Residential address
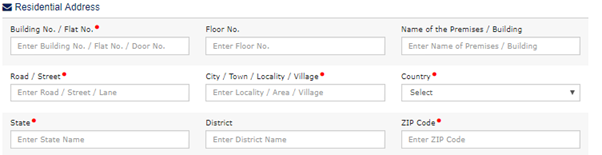
- Building No. / Flat No.
- Floor No.
- Name of the Premises / Building
- Road / Street*
- City / Town / Locality / Village*
- Country*
- State*
- District*
- Pin Code*
Document upload – photograph
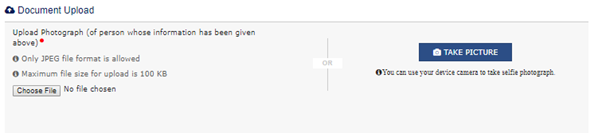
You have 2 options here:
- Upload a Photograph - Only JPEG format is allowed and file size should be less than 100 KB. In case you have a photo which is larger than 100 KB, you can open the same in MS Paint, use the Resize feature and reduce the size as a percentage of the original size to bring it below 100 KB.
- Take a selfie photograph – The GST portal will ask you for access to your device’s camera, click the photograph and auto-upload.
Other information
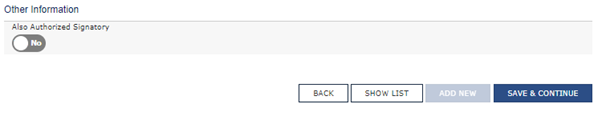
- Also Authorised Signatory (Yes / No; Select Yes if the proprietor is also an authorised signatory and select No if proprietor is not an authorised signatory).
At the end of this page, click Save & Continue.
Authorized signatory
Case 1: If you have selected Yes for Also Authorised Signatory
If you have selected Yes for the Also Authorised Signatory field in the previous page, i.e. your company’s proprietor is also an authorised signatory, then this page will get autofilled with the same details as filled in by you in the Promoter / Partners page. In this case, proof of Authorized Signatory is not required, as mentioned at the end of the page. This is how the page will look like in the portal: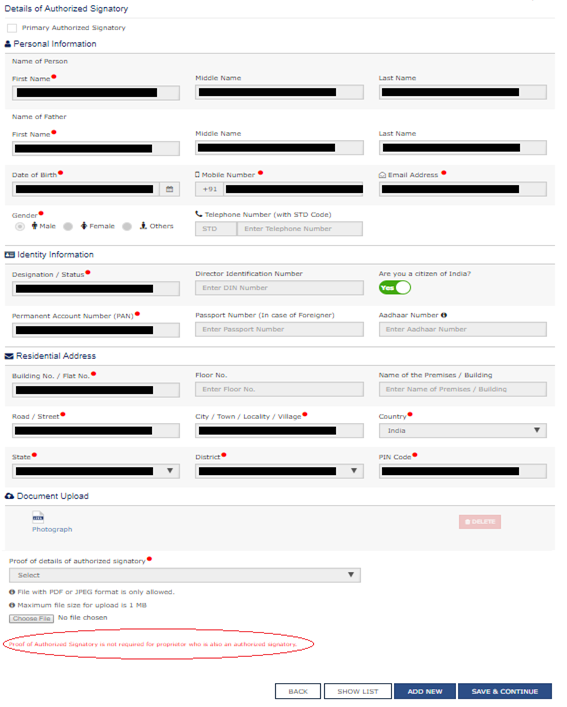
Case 2: If you have Selected No for Also Authorised Signatory / In case of Additional Authorised Signatories
In case, you have selected No for the Also Authorised Signatory field in the previous page, i.e. your company’s proprietor is not an authorised signatory, then this page needs to be filled in by you. However, in both Case 1 and Case 2, you have the option to add additional authorized signatories, by clicking on the Add New button shown at the end of the page. Even in this case, every time you add a new additional authorised signatory, you also need to fill in the fresh Authorised Signatory Page which opens. This is how the page will look like in the portal: 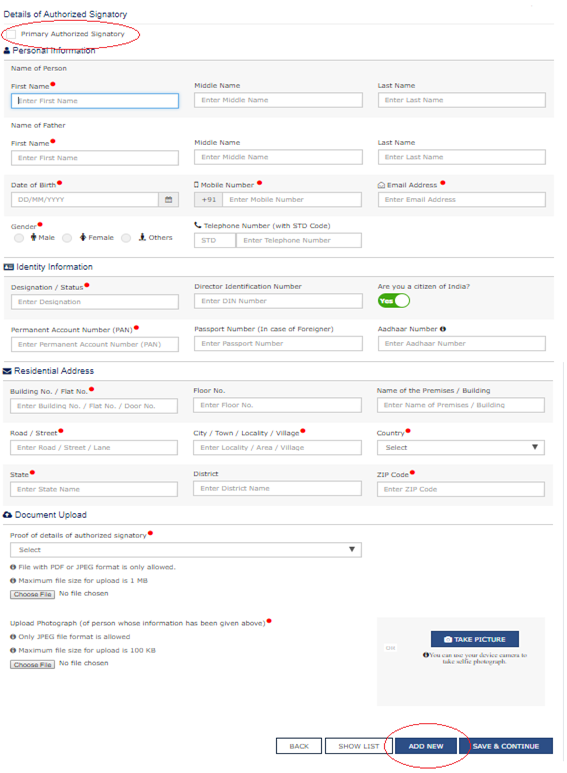
As you can observe, this page is exactly the same as the Promoter / Partners page, with an additional field, in the Document Upload section:
- Proof of details of authorized signatory*
Please note that only PDF / JPEG file of size below 1 MB is allowed to be uploaded here. In case you have a JPEG file, you can compress it using MS Paint as discussed earlier; if you have a PDF file, you can just go online and get the file compressed using any one of the easily available free PDF compression websites. The 2 documents, either of which could suffice as the proof, are as follows:
- Letter of Authorization
- Copy of Resolution passed by BoD / Managing Committee
- At the end of this page, click Save & Continue.
Authorized representative
This section is of importance for all those businesses who are looking to employ the services of a GST practitioner or any other tax expert to handle their returns filing on the GST portal. Accordingly, this page should be filled up, while taking a new registration under GST.
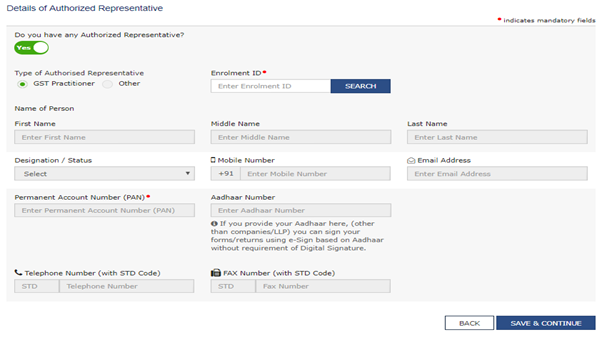
- Do you have any Authorized Representative? (Yes / No; if you select No, the page will remain as it is; if you select Yes, the page will expand and other fields will emerge)
- Type of Authorized Representative (GST Practitioner / Other)
In case you have selected the GST Practitioner option in the field Type of Authorized Representative, the Enrolment ID field will get activated and all other fields will become inactive.
- Enrolment ID* (Active only if you select GST Practitioner option in the field Type of Authorized Representative)
- At the end of this page, click Save & Continue.
In case you have selected the Other option in the field Type of Authorized Representative, the Enrolment ID field becomes inactive, and the other fields become active.
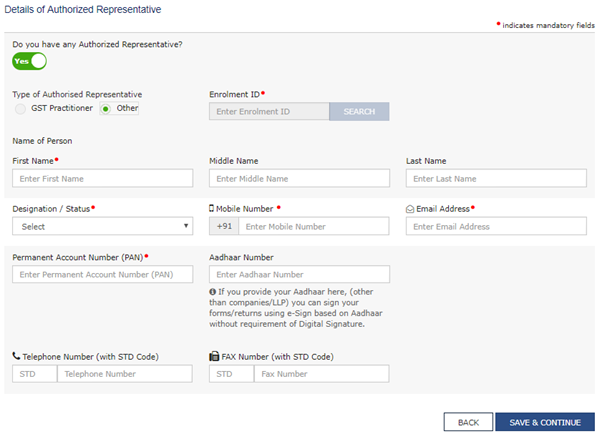
- Name of Person*
- Designation / Status* (Select from list)
- Chartered Accounting holding COP
- Company Secretary holding COP
- Cost Accountant holding COP
- Lawyer currently licensed to practice
- Retired employee of Centre / State Revenue Department
- Mobile Number*
- Email Address*
- PAN*
- Aadhaar Number (If you provide your Aadhaar here, (other than companies/LLP) you can sign your forms/returns using e-Sign based on Aadhaar without furnishing the Digital Signature)
- Telephone Number (with STD Code)
- Fax Number (with STD Code)
- At the end of this page, click Save & Continue.
Principal place of business
Address
State field will be auto filled.
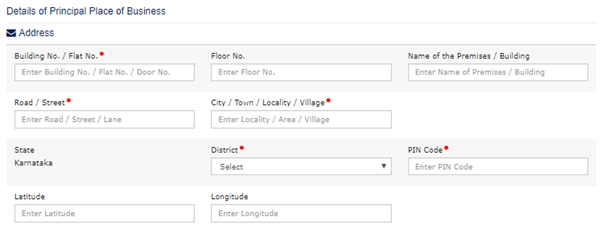
- Building No. / Flat No.*
- Floor No.
- Name of the Premises / Building
- Road / Street*
- City / Town / Locality / Village*
- District*
- PIN Code
- Latitude
- Longitude
Contact Information

- Office Email Address*
- Office Telephone Number (with STD Code)
- Mobile Number*
- Office FAX Number (with STD Code)
Premises Information

- Nature of Possession of Premises* (Select from the list)
- Consent
- Leased
- Own
- Rented
- Shared
- Others
- Proof of Principal Place of Business*
Please note that only PDF / JPEG file of size below 1 MB is allowed to be uploaded here. In case you have a JPEG file, you can compress it using MS Paint; if you have a PDF file, you can just go online and get the file compressed using any of the numerous free PDF compression websites.
Nature of Business Activity
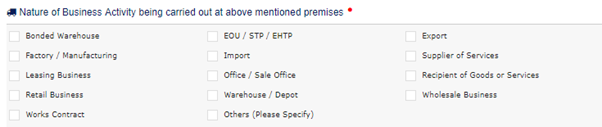
You can select one or more of the following options listed:
- Bonded Warehouse
- Factory / Manufacturing
- Leasing Business
- Retail Business
- Works Contract
- EOU / STP / EFTP
- Import
- Office / Sale Office
- Warehouse / Depot
- Export
- Supplier of Services
- Recipient of Goods or Services
- Wholesale Business
- Others (Please Specify)
Additional Place of Business

- Have additional place of business? (Yes / No)
At the end of this page, click Save & Continue.
Additional places of business
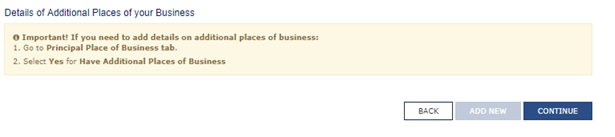
In case you have selected No for the field Have additional place of business? in the previous page, this page will appear blank with a notice, explaining how you can add details of additional places of business, if you wish to. In case you have nothing more to add, you may click Continue and proceed.
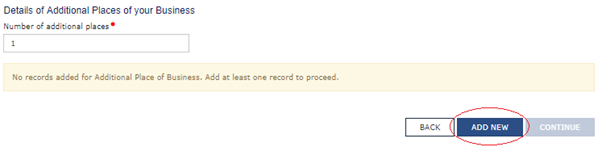
In case you have selected Yes for the field Have additional place of business? in the previous page, the page will prompt you to share more details:
- Number of additional places*
- Click Add New at the bottom of the page (Every time you click Add New, a page exactly similar to the Principal Place of Business will open up, wherein you have to enter the details of your additional places of businesses).
- At the end of this page, click Save & Continue.
Goods and services
Goods
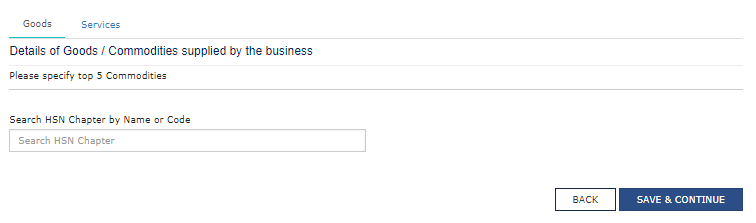
You can search for the goods / commodities supplied by your business, either by name or by HSN code, which is crucial for new registration in GST.
Services
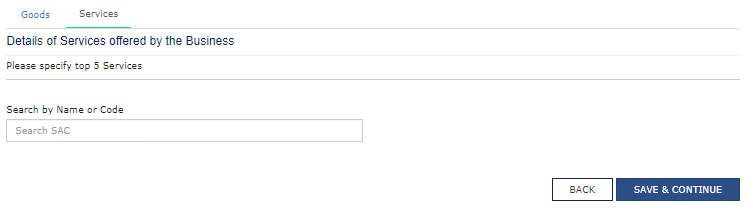
You can search for the services offered by your business, either by name or by SAC code, which is crucial for new registration in GST. At the end of this page, click Save & Continue. Note: However, please note that the HSN and SAC codes provided in the GST portal are still the old code numbers, and do not match with the fresh list as per CBEC. Therefore to be on the safer side, it is best to search Goods/Services by name from the drop down list provided, and then select them.
Bank accounts
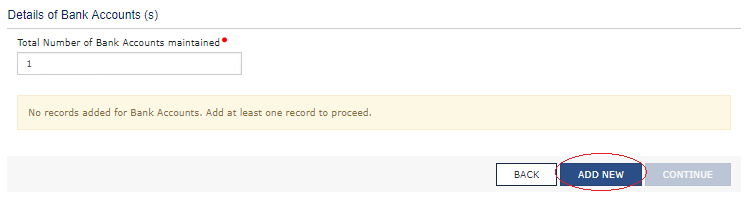
- Total Number of Bank Accounts maintained* (Enter the number of accounts)
- Click Add New to enter the bank account details (On doing so, a new table will emerge which will need to be filled up).
Details of Bank Account
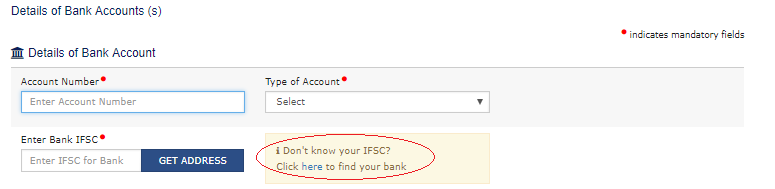
- Account Number*
- Type of Account*
- Enter Bank IFSC* (In case you are not aware of your bank’s IFSC Code, a search link has been provided, where you can determine the IFSC Code by providing the Bank Name, State, District and City. Enter the IFSC Code and click Get Address to confirm the address).
Document Upload
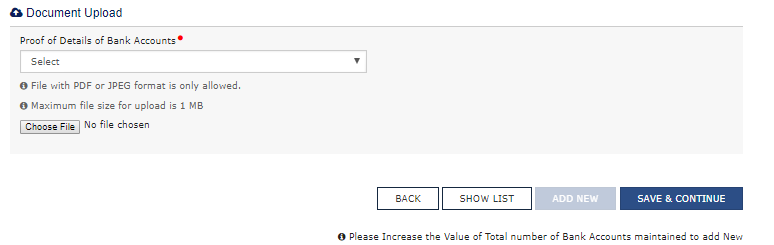
- Proof of Details of Bank Account*
Please note that only PDF / JPEG file of size below 1 MB is allowed to be uploaded here. In case you have a JPEG file, you can compress it using MS Paint; if you have a PDF file, you can just go online and get the file compressed using any of the numerous free PDF compression websites. The documents which you may upload are:
- Bank Statement
- Cancelled Cheque having name of Taxpayer
At the end of this page, click Save & Continue.
State specific information
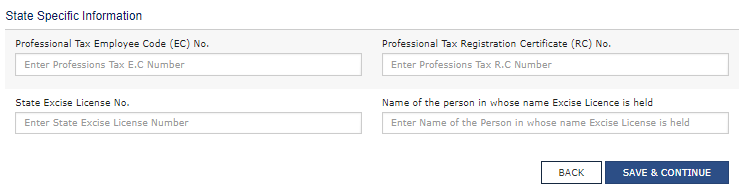
- Professional Tax Employee Code (EC) No.
- Professional Tax Registration Certificate (RC) No.
- State Excise License No.
- Name of the person in whose name Excise License is held
- At the end of this page, click Save & Continue.
Verification
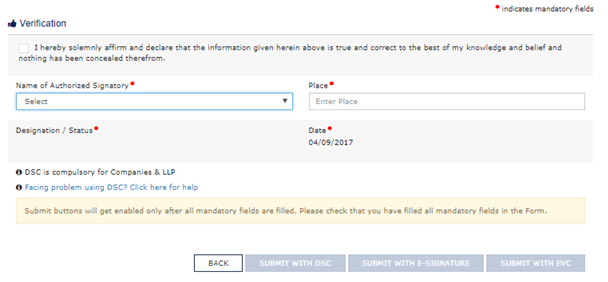
- Tick the check box
- Name of Authorized Signatory* (The name of Proprietor / Principal Authorized Signatory will show up in the list, select the same).
- Place*
- Designation / Status* (This auto fills based on who you select in Name of Authorized Signatory).
- Date* (Auto fills as current date)
As per the notice at the bottom of the page, the Submit buttons will get activated only when all mandatory fields have been filled. You can submit the verification, either by any of the following 3 options:
- Digital Signature Certificate / DSC (Compulsory for Companies & LLP; A link has been provided in case you are facing any problem using DSC).
- E-Signature
- Electronic Verification / EVC (OTP will be sent to your registered Email ID and registered Mobile Number. The OTP will be valid for 10 minutes within which you should complete the submission).
After submission
Once you have submitted your GST REG-01 form, you will receive an E-mail and SMS, notifying you that your new registration application has been submitted. This notification will contain the 15 digit Application Reference Number (ARN). You can use the ARN to track your application status, and keep a tab of your new GST registration procedure on the GST portal.
-
- Log in to www.gst.gov.in
- Go to the Services tab and take your cursor to Registration. Once you do that, 2 tabs will become visible New Registration and Track Application Status. Click on Track Application Status.
-
- ARN*
- Captcha Code* (Type as provided)
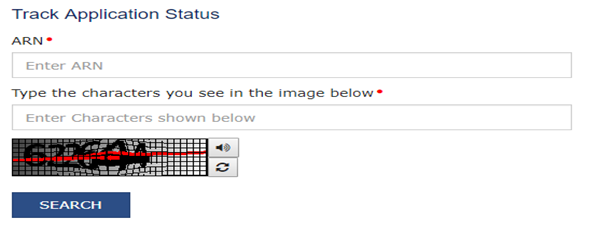
Based on the ARN entered your application status will show up as Form GST REG-04, as shown below:
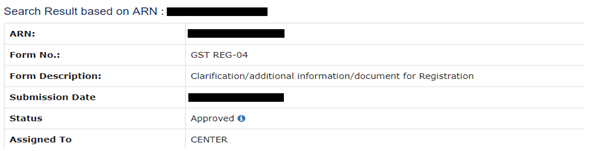
To get more understanding on what the Status means, click on the ’i’ symbol inside the small blue circle which appears in the Status field.
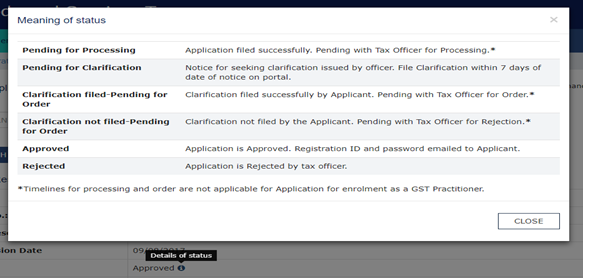
Application form status
Once the Application Form is submitted, it is subject to mandatory verification in the GST portal, based on which it could get approved or rejected. Also, in certain cases, there might be certain fields for which some more explanation or further documents might be additionally required from your side. In case, some more clarification is required from you, a Show Cause Notice (SCN) Reference No. will be provided using which you need to log into the portal, navigate to the exact page and field where the clarification is needed, and use the same to upload the relevant documents. Following are the possible Status situations that your form might be in at any point:
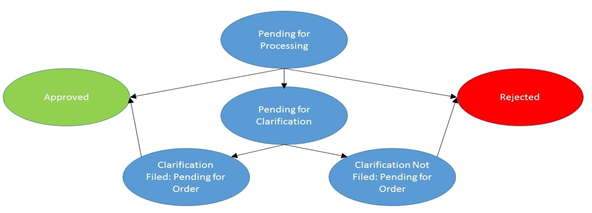
For your understanding, we have provided a flow chart below to illustrate the various stages of Status that the application form goes through in the GST portal.
Conclusion
Once your New Registration Application has been verified and approved in the GST portal, you will receive a 15 digit GSTIN (Goods and Services Tax Identification Number) along with a temporary password. You can start logging in by using the GSTIN number as the User ID and the temporary password which you can reset. Here's hoping that you conclude your new registration in GST without hassle, and enjoy your seamless GST compliance experience!
Read more on DSC, E-sign and EVC
Latest Blogs

Nuts & Bolts of Tally Filesystem: RangeTree

A Comprehensive Guide to UDYAM Payment Rules

UDYAM MSME Registration: Financial Boon for Small Businesses
Understanding UDYAM Registration: A Comprehensive Guide
MSME Payment Rule Changes from 1st April 2024: A Quick Guide

Are Your Suppliers Registered Under MSME (UDYAM)?

